


For the past six months, we’ve been busy preparing grounds for new segmentation in our app. Currently, the project is coming to a close and we’ll soon start migrating the selected clients to new features. In the meantime, we’ll monitor the implementation to catch possible bugs - with full support to our clients in case of any problems.
Segmentation was created to facilitate the creation of groups of subscribers for targeted campaigns. Thanks to this feature you don’t have to search for tags in the “Targeting” step when sending a push campaign. You only have to click on a previously prepared segment. The notification will be sent to subscribers who match its requirements.
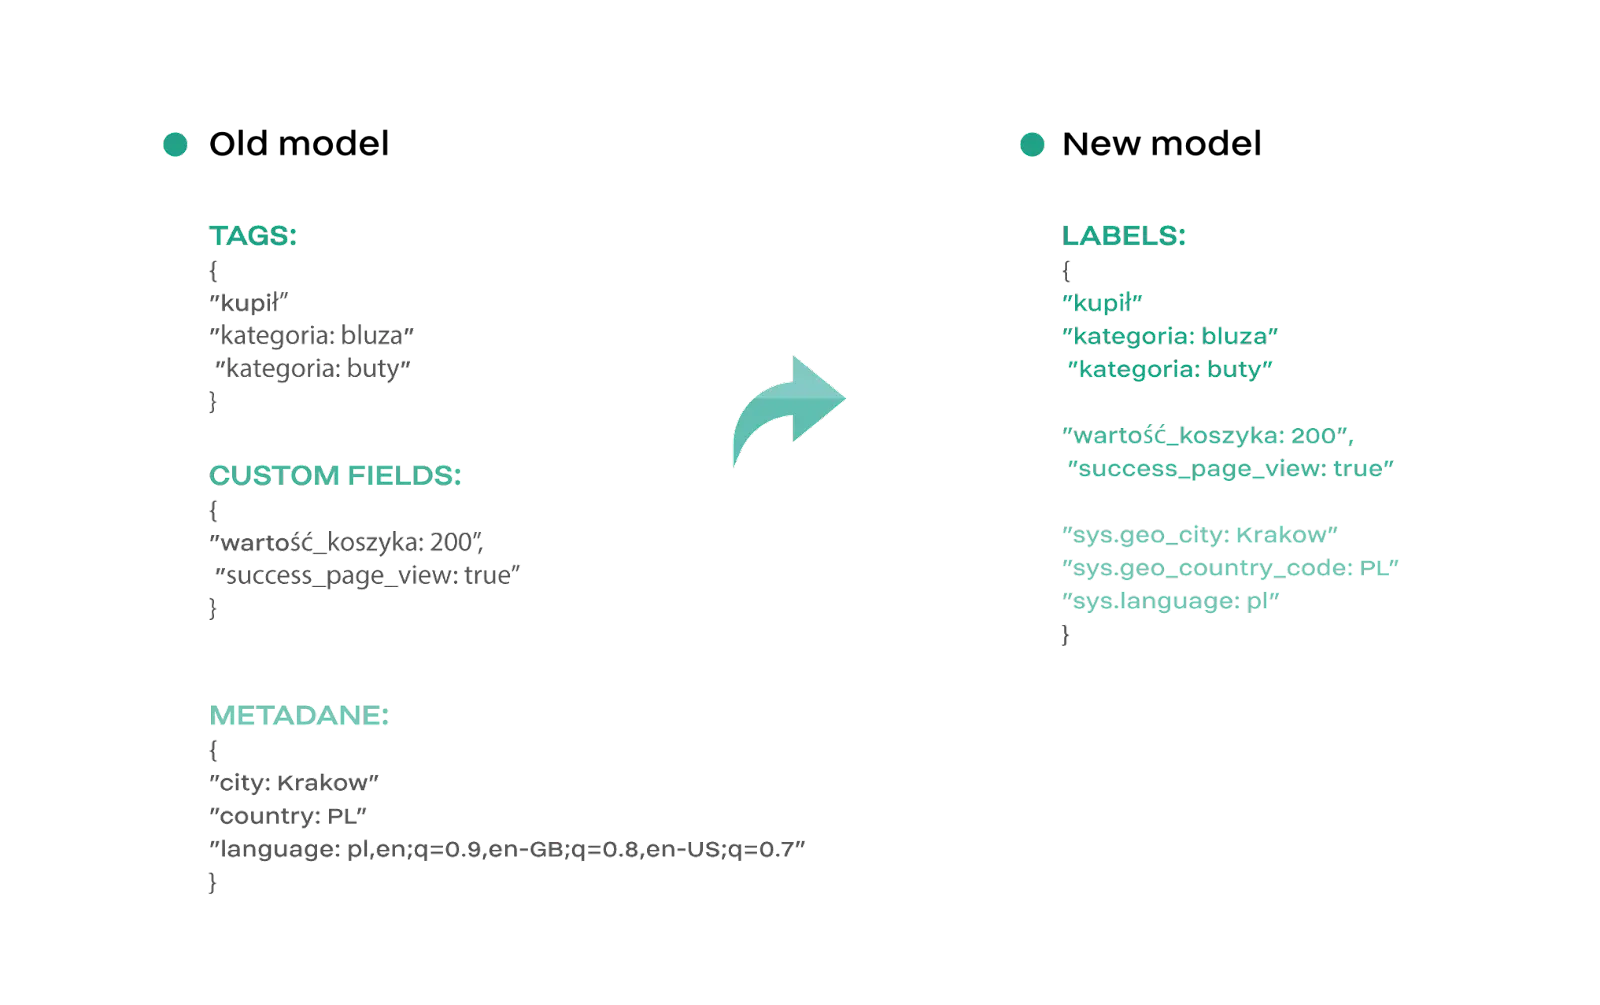
Before describing and explaining the new segments and changes they bring to the app, let’s take a look at the changes in data models. Previously, the subscriber's data was organized in the following parameters:
Currently, we transformed all information coming from those places into “labels”. Each label has the following characteristics:
To better understand those characteristics, here’s a comparison of old and new structures:
In accordance with the newly implemented model, we’ve introduced changes in the subscriber’s “History” view.
Before:
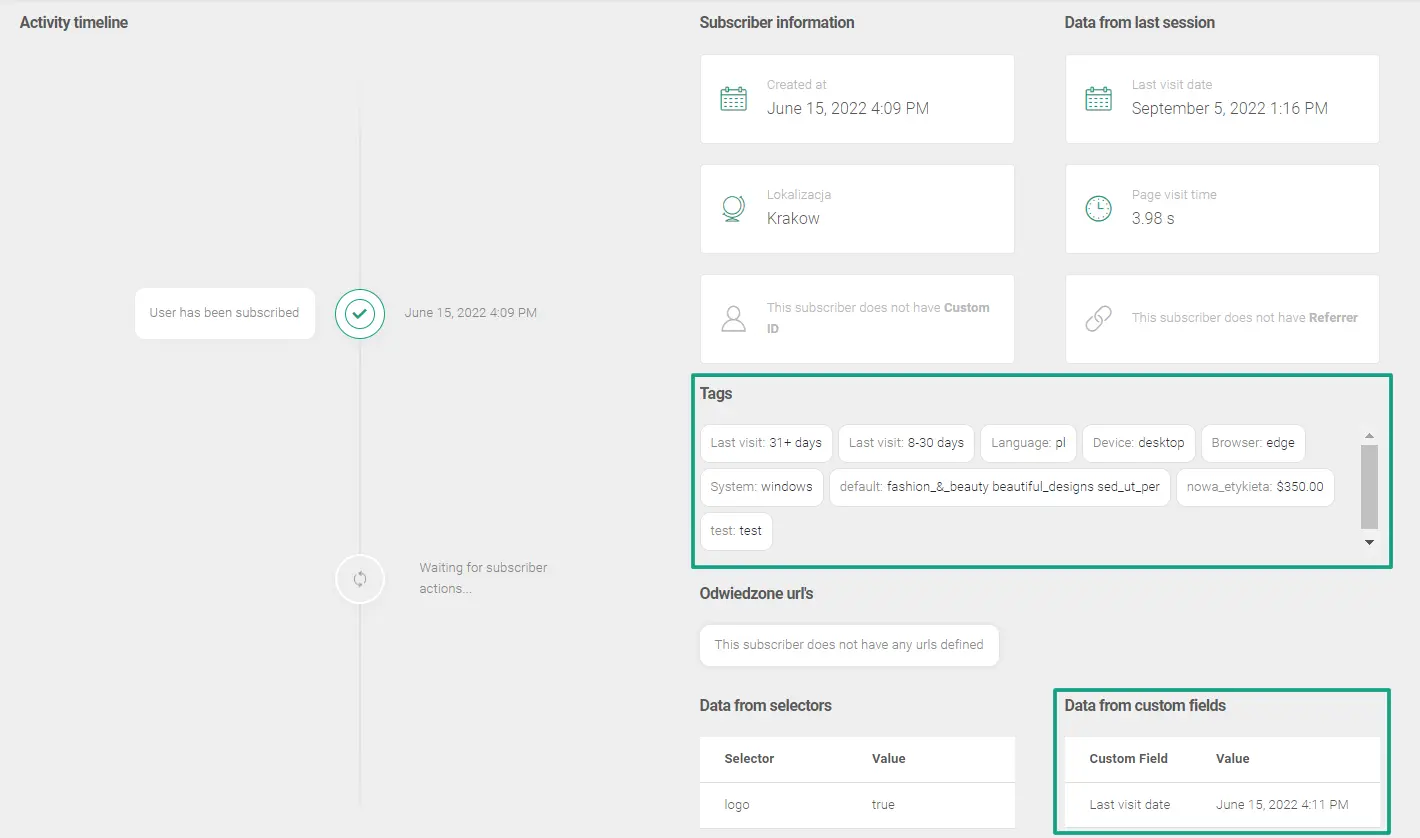
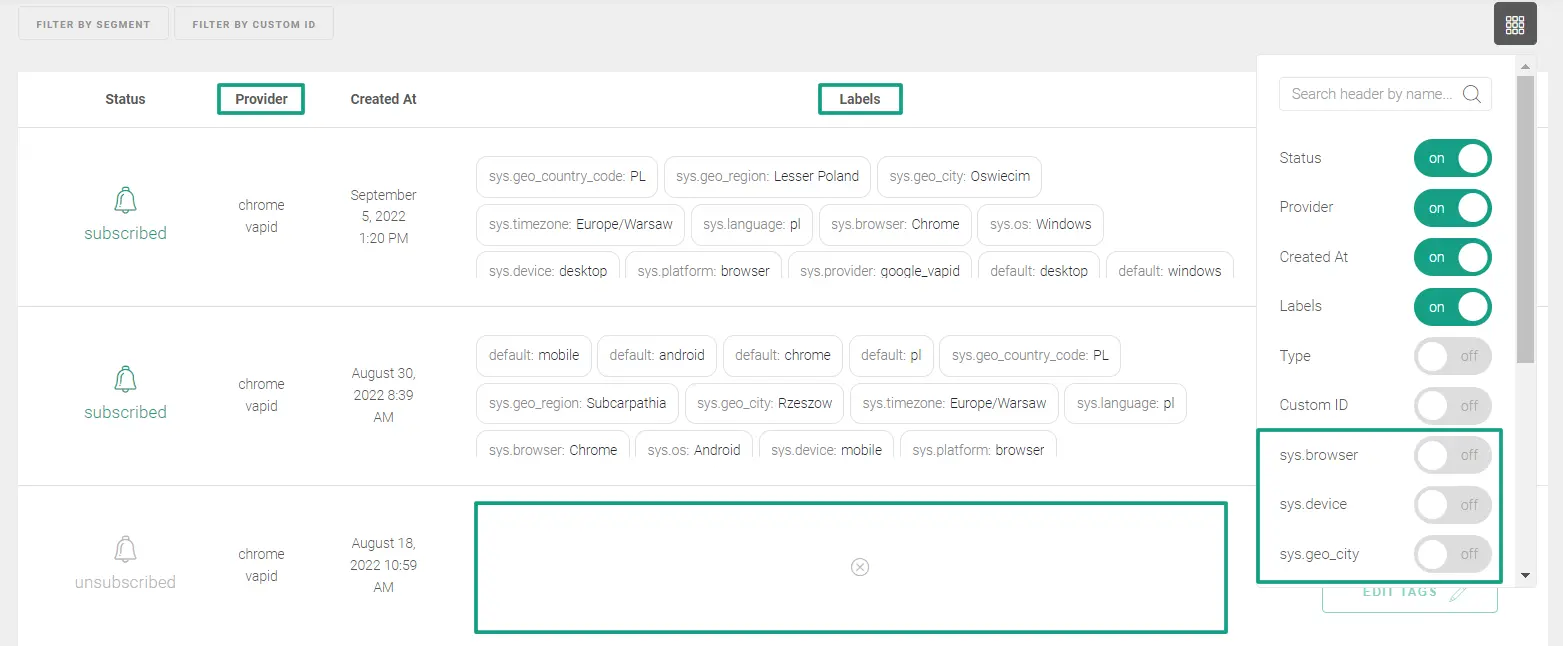
We removed the “Custom fields” block. The data will be transferred to the “Labels” block, together with other subscriber characteristics. There’s also a new “Provider” block highlighted in the top part of the section.
After:
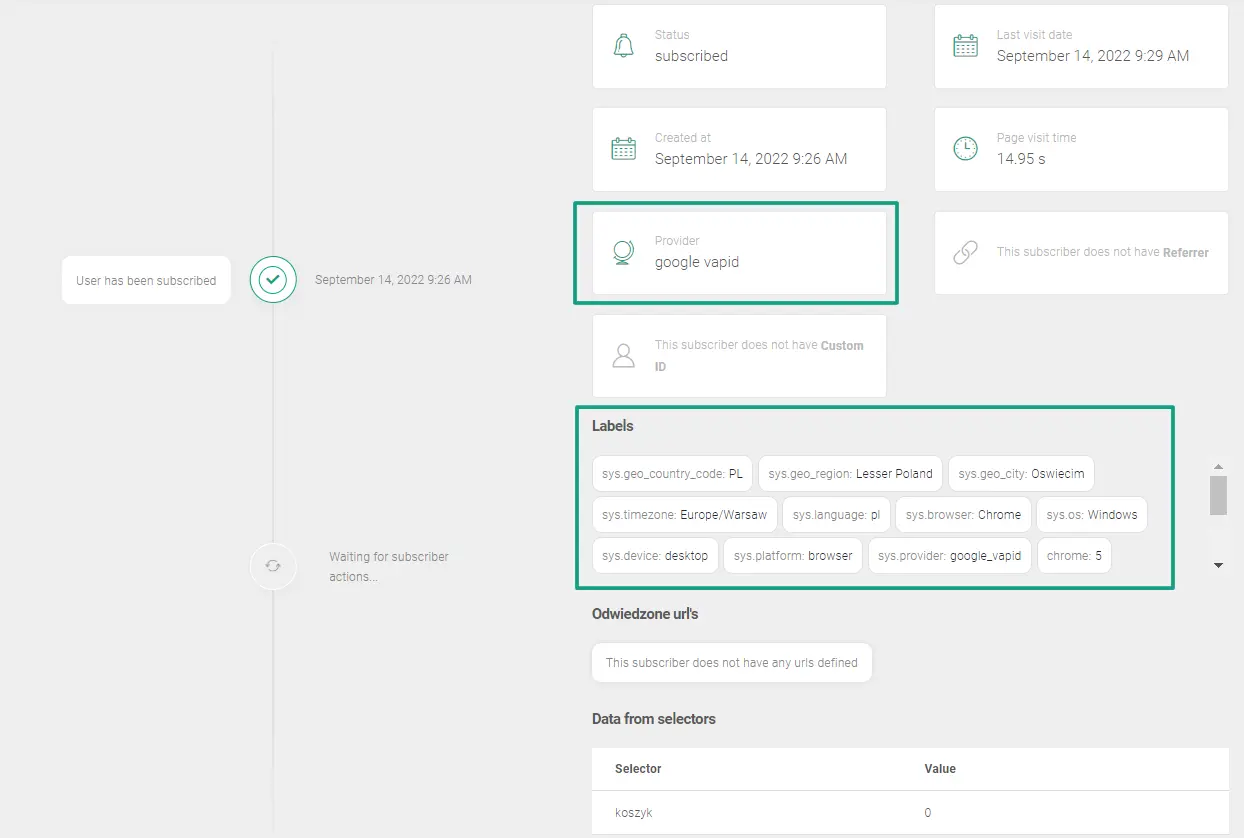
We also replaced system tags (ex. System: windows, Browser: edge, Device: desktop, Language: pl). Instead, you’ll have a number of system labels at your disposal. System labels are non-editable. It means that you won’t be able to add, delete or modify them. The “sys,” prefix is unique for system labels, so you can’t use it in Label Key when you prepare new labels.
Here’s the list of system labels with examples.
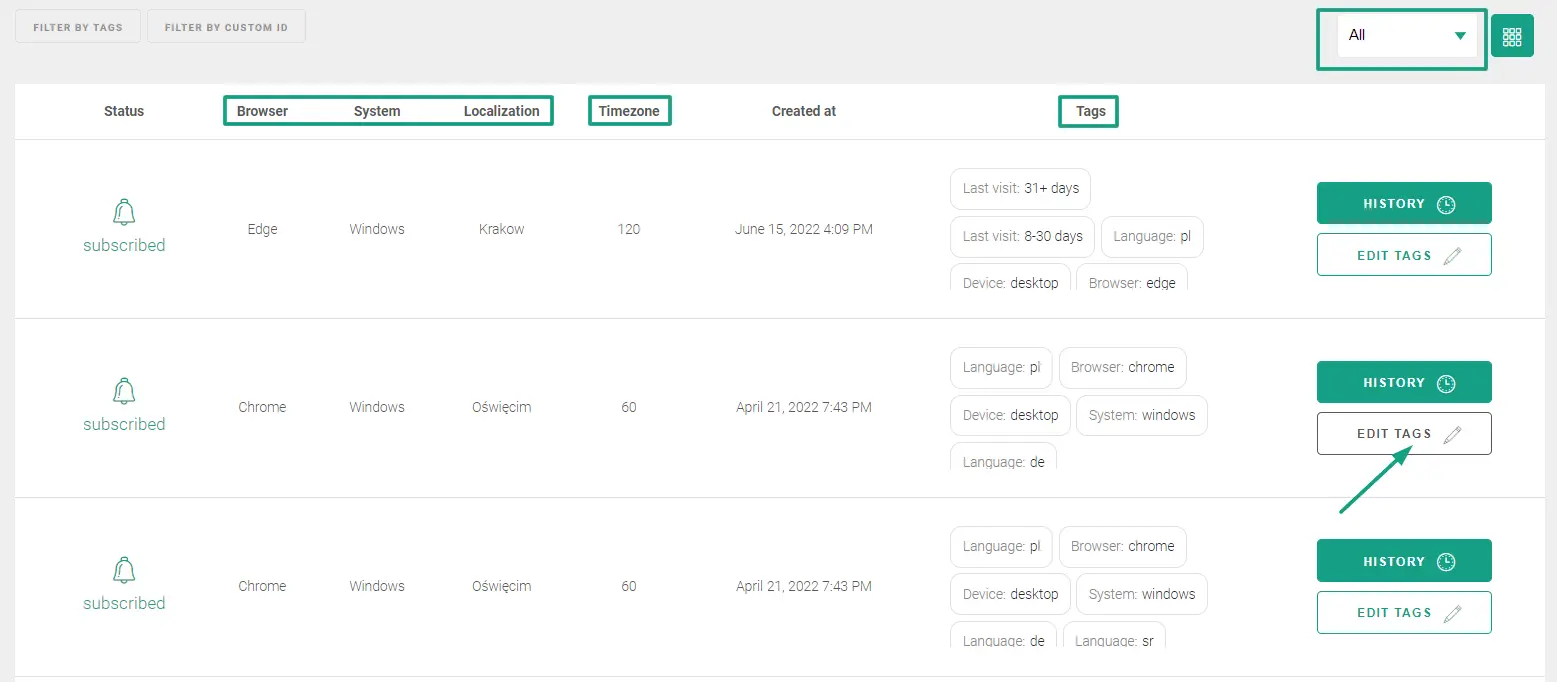
Another view affected by the changes is the subscriber list
Before:
After:
As you can see, filtering subscribers by date won’t be possible, and the naming connected with tags will be replaced by labels. You won’t be able to include the data from the custom fields due to the fact that it also will be “labels” now. You can extract the system label data, which includes the most important information on a subscriber. Also, when the subscriber resigns from the subscription, their labels disappear.
When you click “Edit labels” on a given subscriber, you’ll notice changes in naming of some elements:
Before:
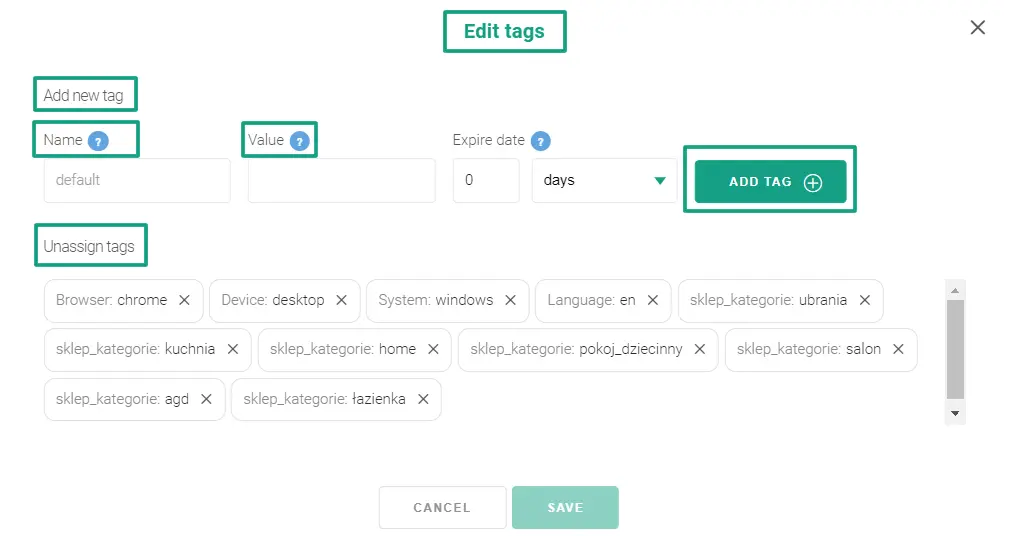
After:

We’ve added a possibility to use ‘.’ in label descriptions in the “Label key” field. The punctuation mark will also be available in all places where labels are added.
Additionally, you’ll find information on TTL (time-to-live or expiration date) in the subscribers list and in the subscriber’s subpage.
There is one important change occurring in the subscriber list view. We’ve deleted the possibility to filter subscribers by tags. You can filter them by segments instead.
Before:
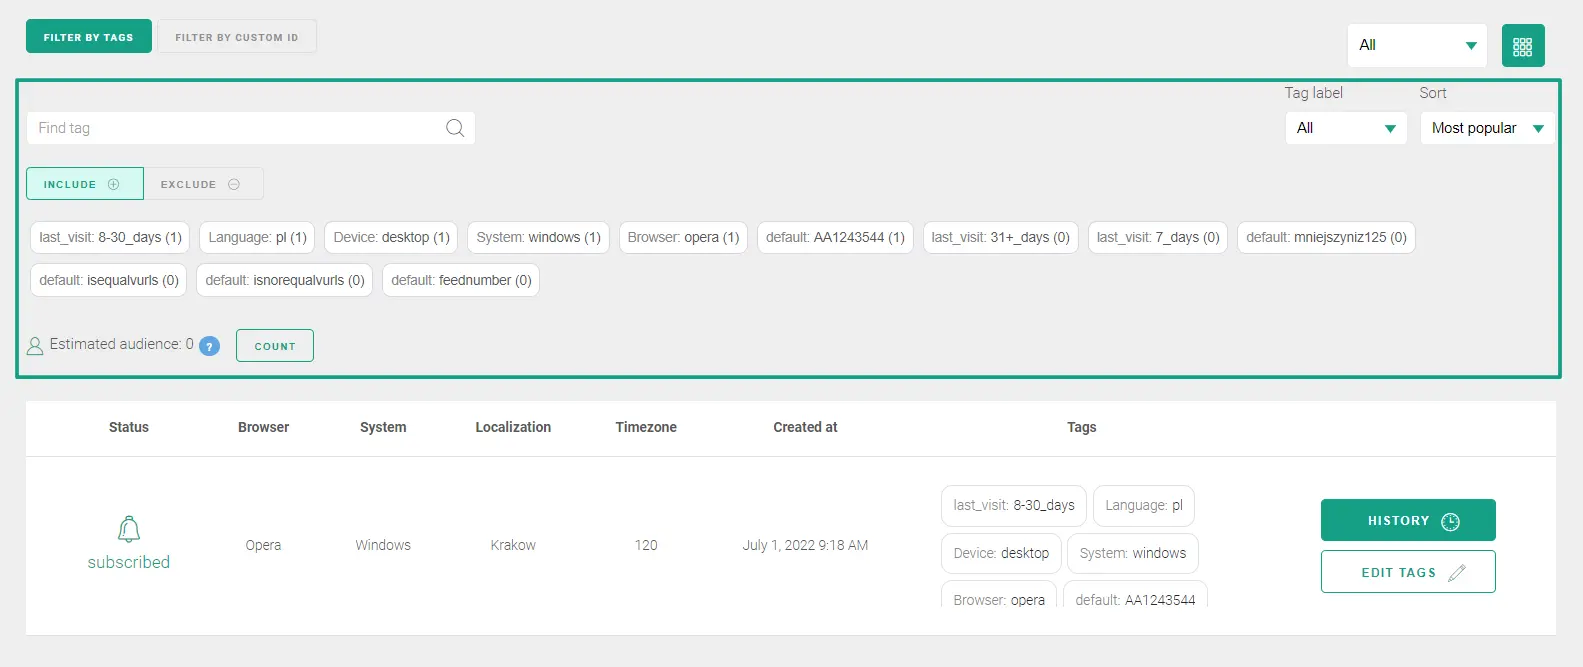
After:
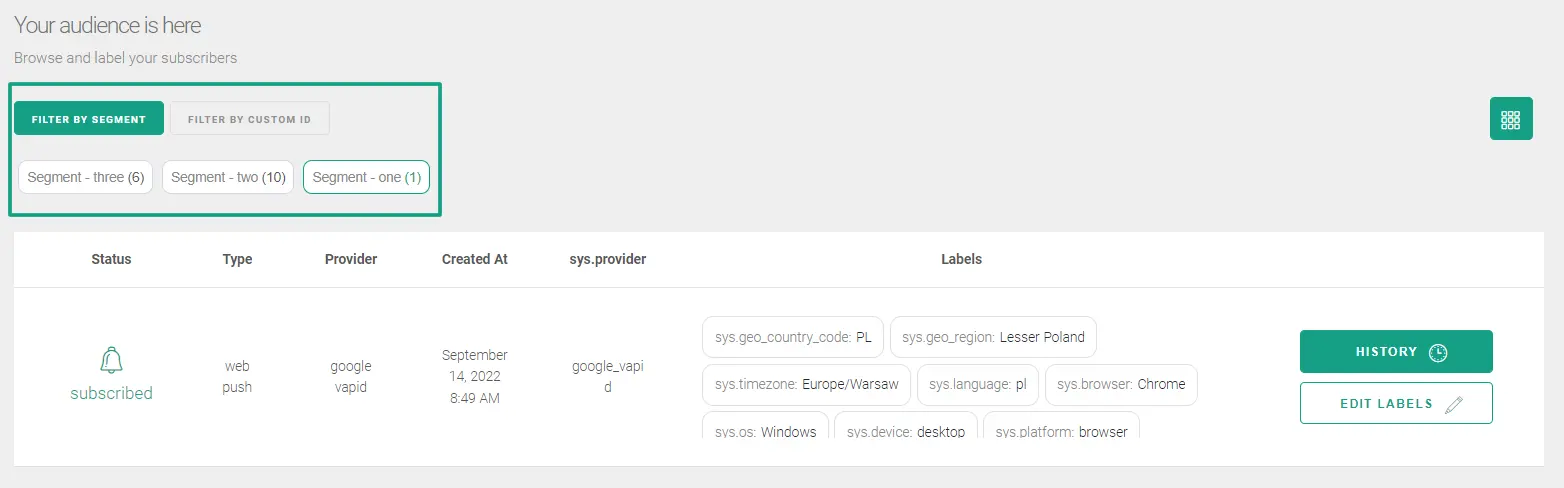
This change makes the filtering faster. You no longer have to search for desired tags or exclude irrelevant ones. All you have to do is click on a chosen segment to receive a list of linked subscribers. The number in brackets next to a given segment displays the number of subscribers who fit its requirements.
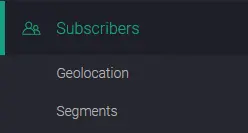
“Segments” is a new feature appearing in the navigation bar.
Before:

After:
Clicking on it takes you to a new view. The component will be empty until you create your first segment. You can do it by clicking one of the two buttons:
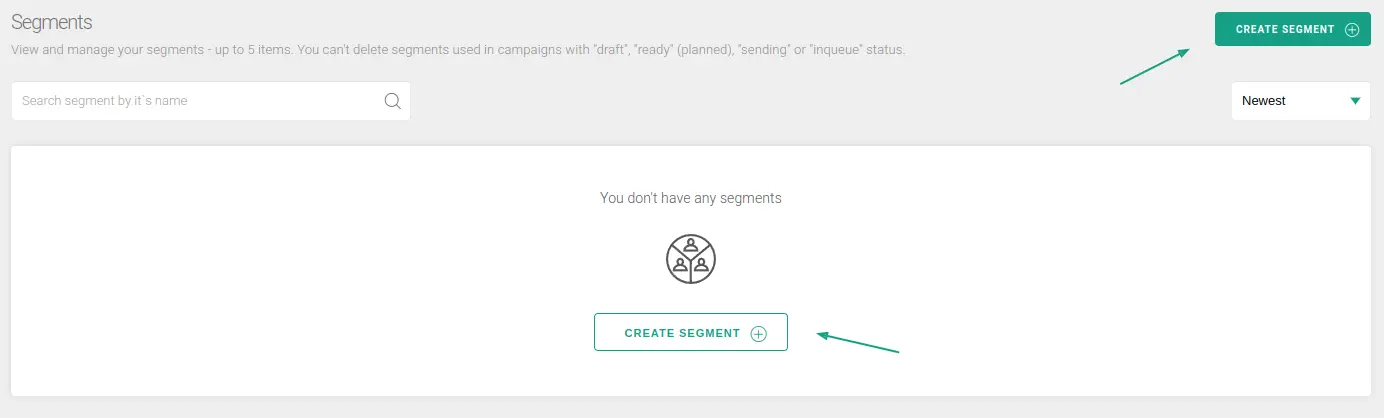
In the creator, you can declare conditions to extract subscribers.
Below, you can see a segment creation view:
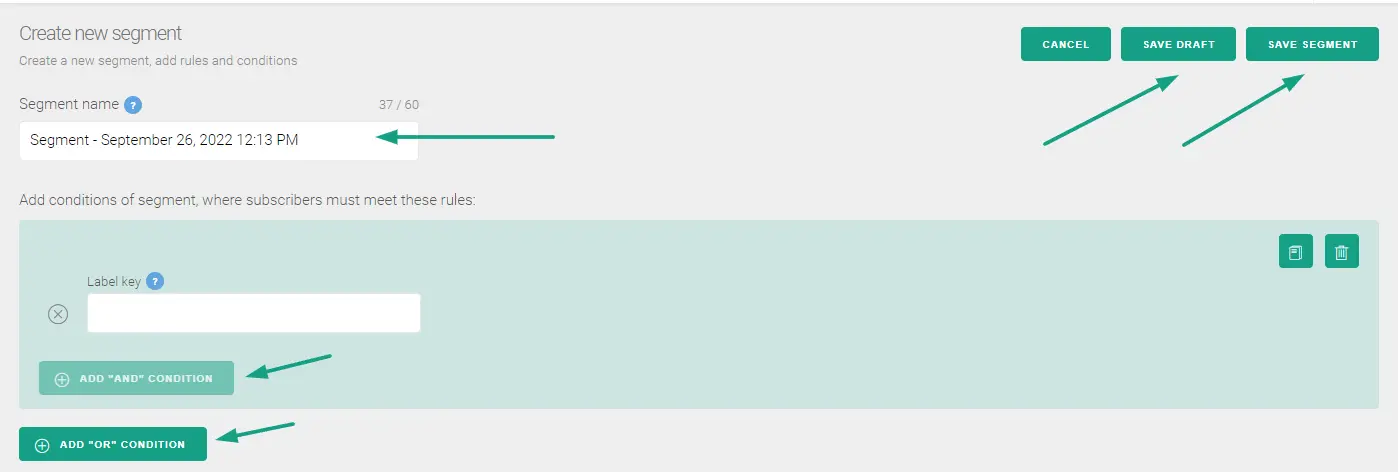
Segment name will be filled in automatically with the date and hour of creation. You can change it and add details essential for the segment using up to 60 A-Z, a-z, 0-9 and - _ : + . sings and space.
Below the name, you’ll find the core part of the creator: ascribing the conditions based on labels. Just to recap: a single label has the “key: value” form. Similarly, segments have a “Label key” (key), a matching operator (ex. “Equal”), and a specific “Label Value”. You can add new conditions with a green “AND” button.
The next added groups are preceded by the “OR” strategy. You can add more “AND” conditions within them. See an example:
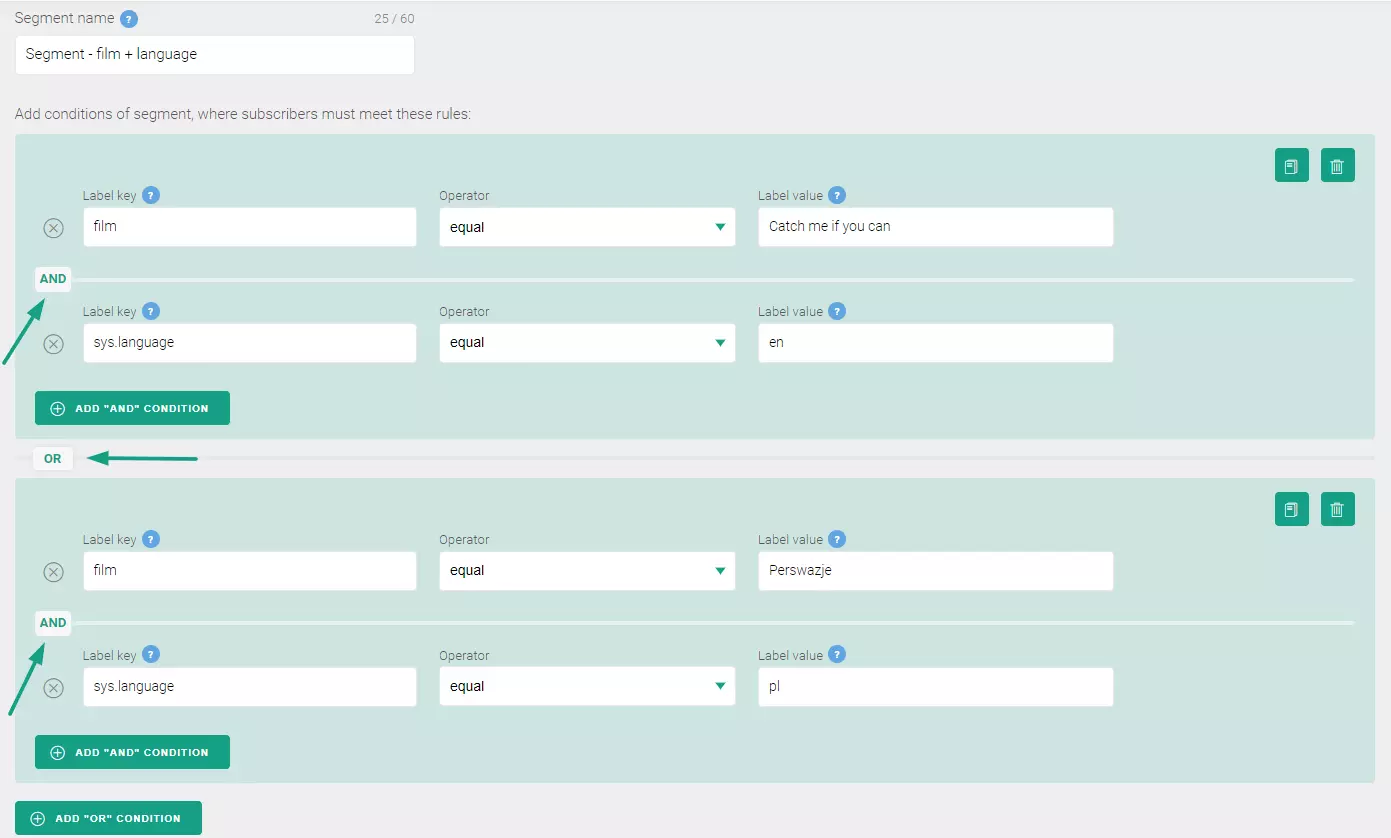
Remember that a segment must consist of at least one condition.
When you create label-based conditions for your segment, you will use a number of operators.
‘Equal’ and ‘not equal’ allow you to add subscribers who have (or not) certain labels added. In an example below you can see a segment condition in which subscribers have a system label describing the browser they use.

The label key and operator allow you to choose a specific label value from a list.
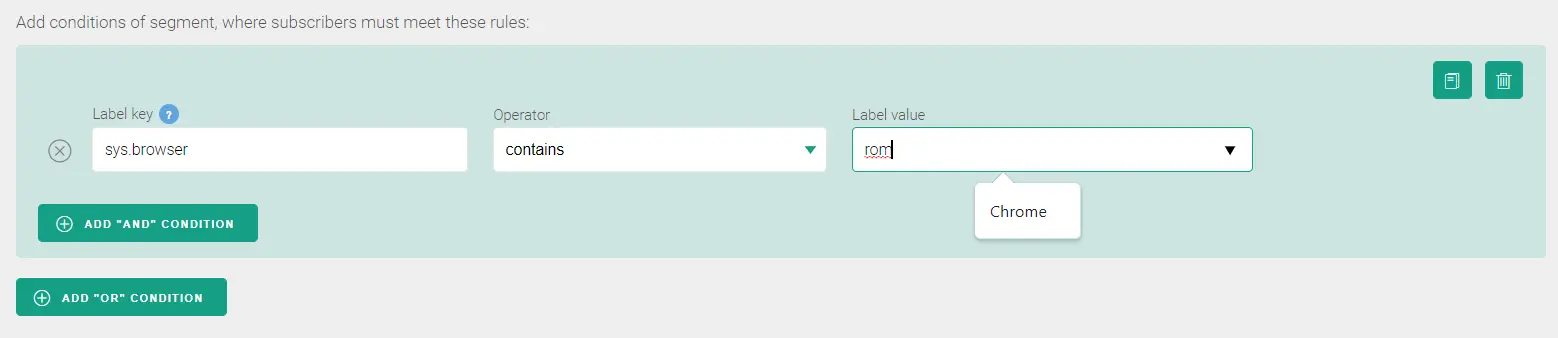
Another pair of operators is ‘contains’ and ‘not contains’. Those conditions also allow you to to find a label value from a list or type it in. Using those operators you can check if labels added to subscribers in a selected label key include a certain phrase or not. For example: if browser system label contains Chrome.
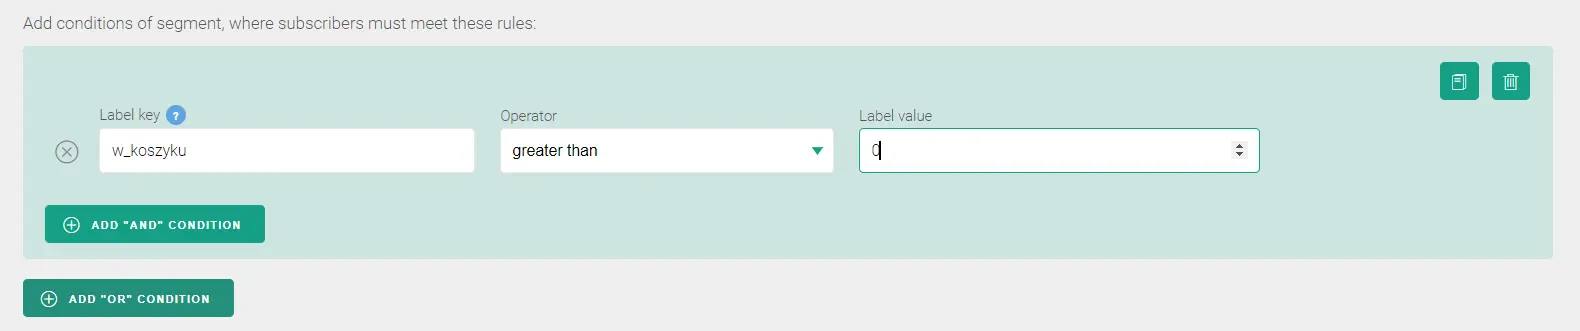
There are also numerical operators: ‘greater than’, ‘greater than or equal, ‘lower than’, ‘lower than or equal’. Choosing one of them, you can address numerical values in label value. For example you can see if a subscriber has more than (‘greater than’) 0 items in their cart.
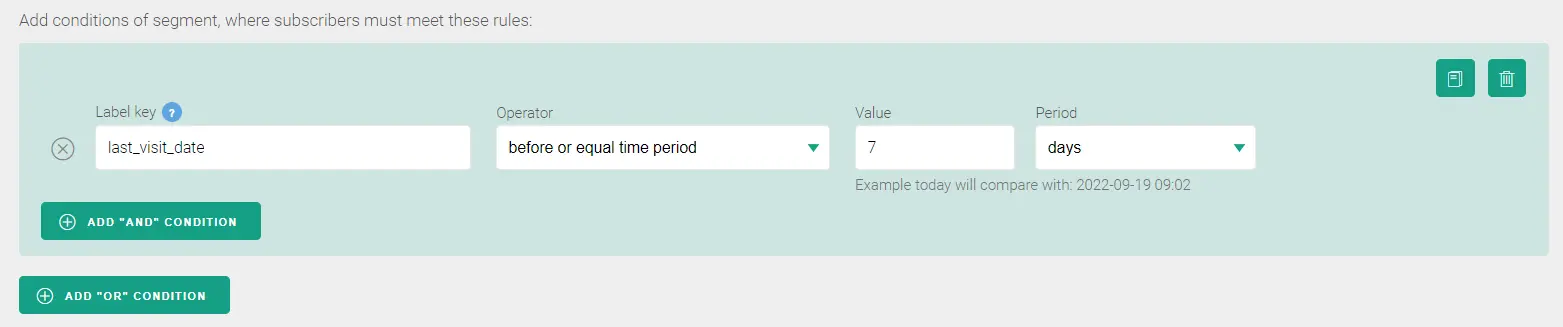
The last operator type is date-related operators: ‘after or equal time period’ and ‘before or equal time period’. Setting periods according to which the labels will be classified, you can see if a certain action took place before or after the set date. For example, your segment can include subscribers who visited your website in the last seven days.
After you prepared a segment, you can save a draft (by clicking ‘Save draft’ in the top-right corner) or save and calculate it by clicking “Save” in the creator's top-right corner. A saved segment will be ready to use in a targeted campaign. After saving you’ll see a number of subscribers meeting the conditions. That’s how you’ll be able to assess the size of a group that may receive a targeted push within a given segment.
A prepared and saved segment will appear on the segment list. You may notice different colors of segments here. Green means that the segment is properly counted and ready to use. Drafts are marked with grey, and yellow segments are still being calculated and prepared.
The positions can be viewed alphabetically or chronologically. You can delete, copy and edit segments, and even create a campaign for a specific one (with a ‘Ready’ status) by clicking on the green button with an arrow symbol.
Remember that you can only have up to five segments per project.
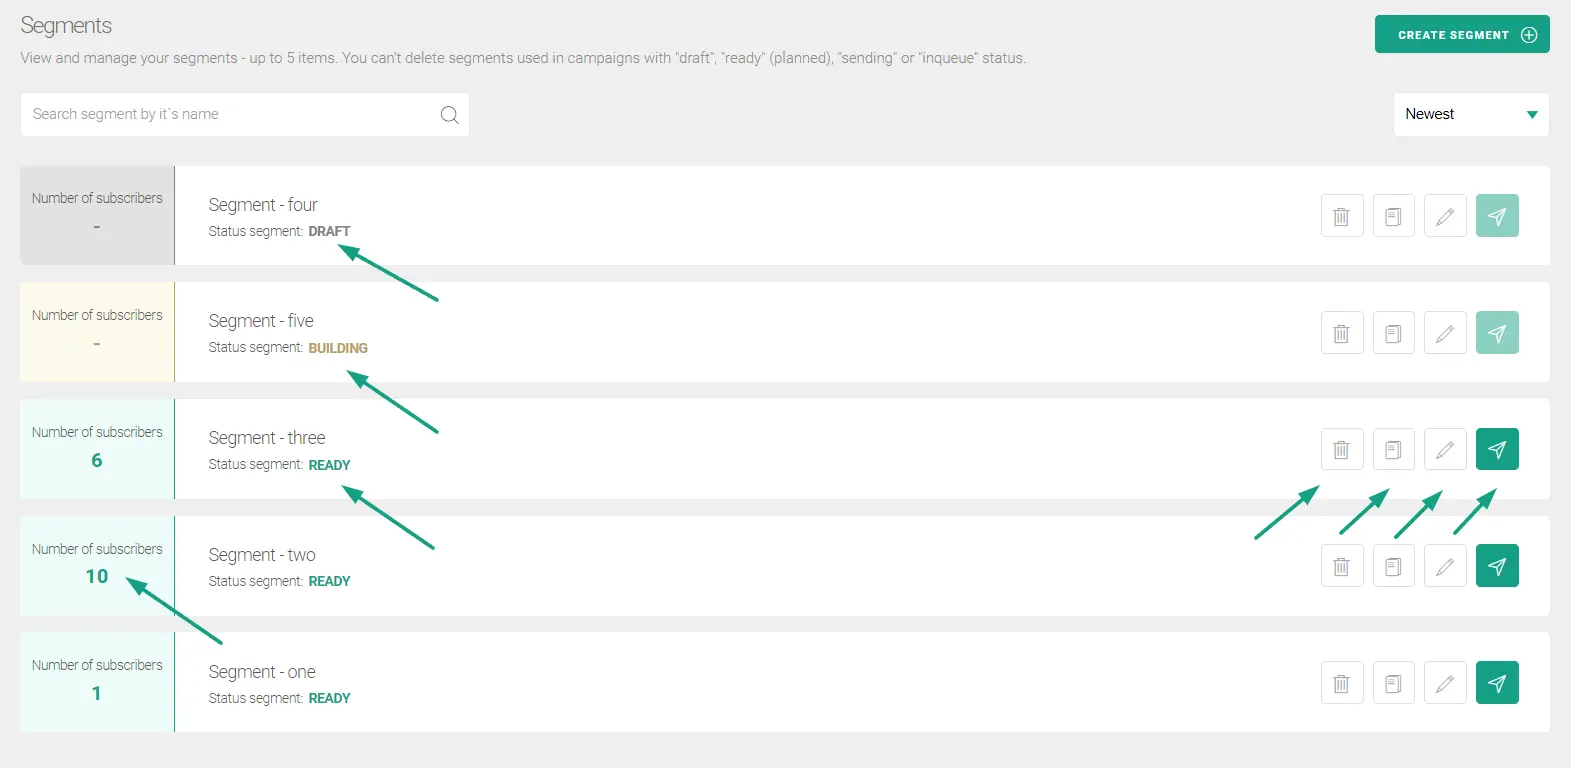
You won’t be able to delete a segment used in a campaign that’s planned, drafted, or currently being sent. This allows us to prevent problems in created campaigns.
After declaring the segments, we’re ready to prepare a campaign.
In the middle section of a ‘Send campaign’ view, you’ll see a ‘Targeted campaign’. It’s similar to the previous ‘Push’ option, but we’ve updated it with the segments.
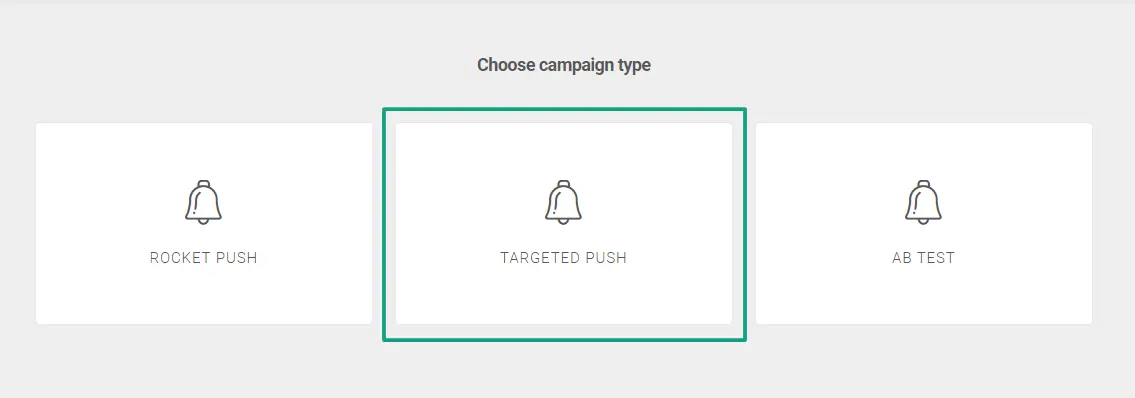
You will see some changes in the creator, similar to the ones introduced in AB testing, that make the process more intuitive and user-friendly.
Before:
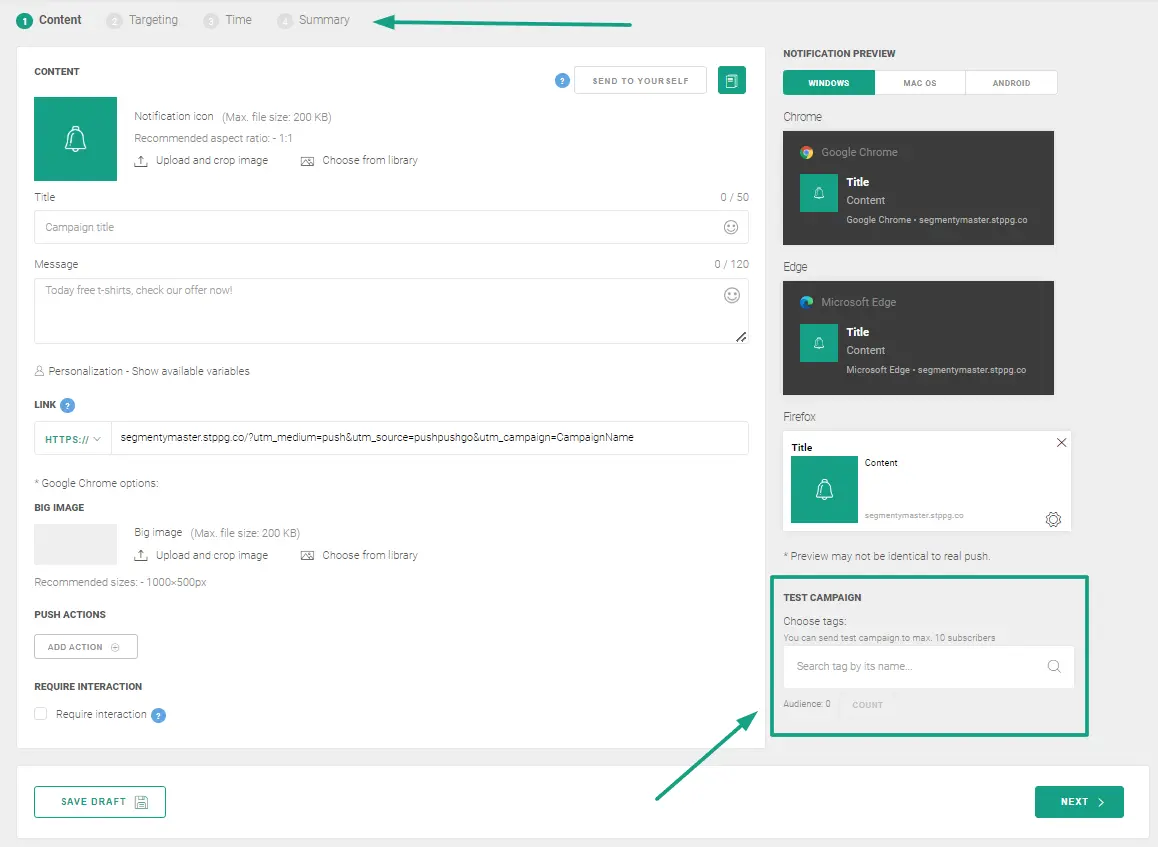
All campaign steps are featured in one view. It facilitates control over the information. We also got rid of the rarely-used “Test campaign” feature.
After:
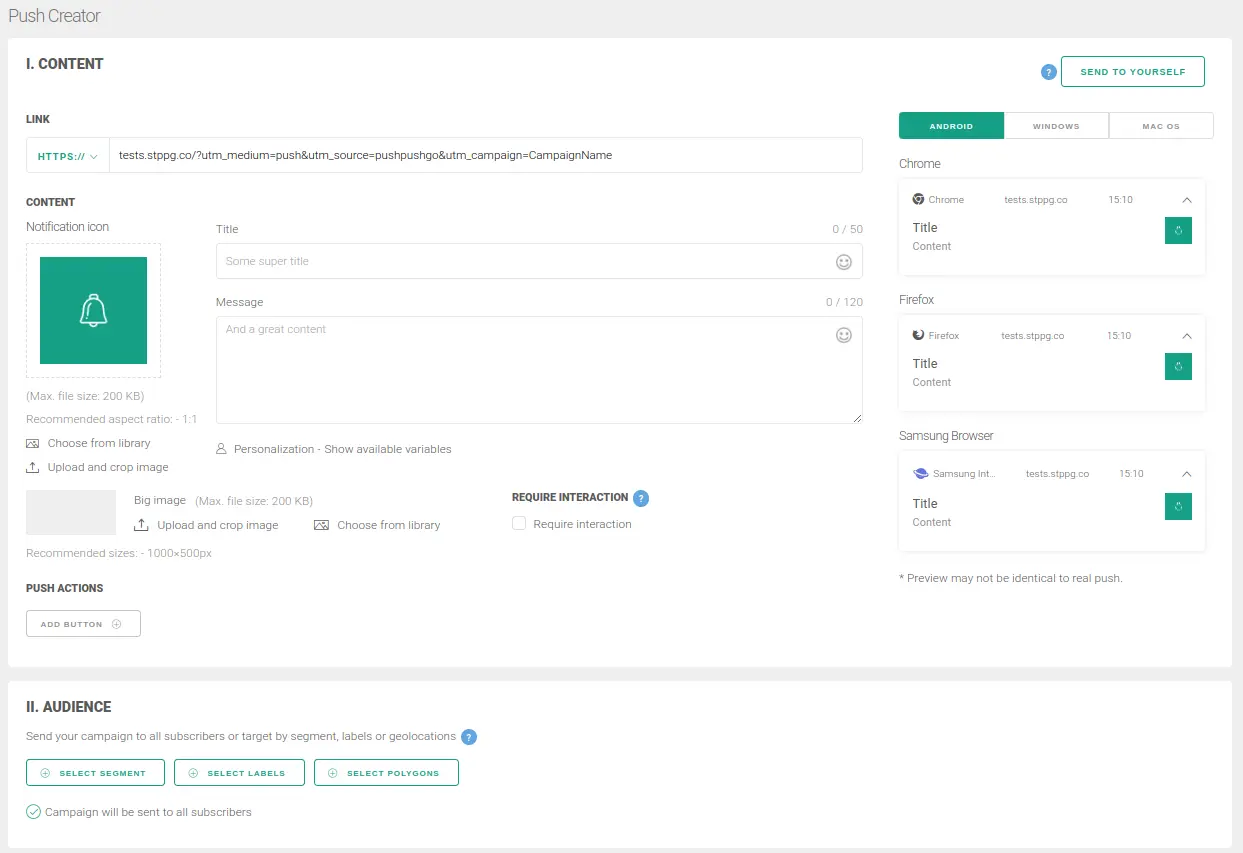
The ‘Content’ section remains mostly unchanged. We’ve strengthened ‘Title’ and ‘Message’ validation, which means that the current limits of signs in those fields cannot be exceeded.
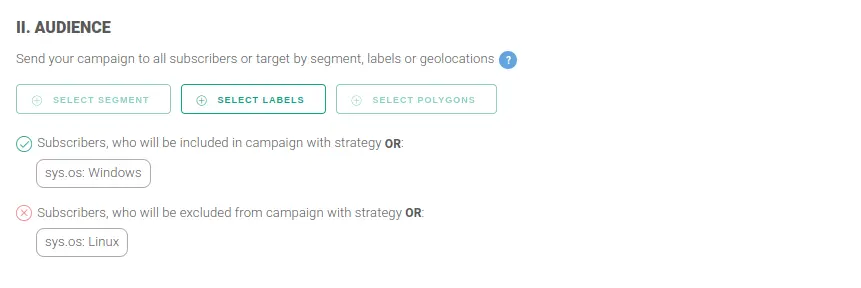
In the second block (“Audience”) you can choose one targeting option: segments, labels, or polygons.
To choose segments, click the “Select segment” button. This will open a dedicated modal with previously prepared segments.
You can choose only one segment.
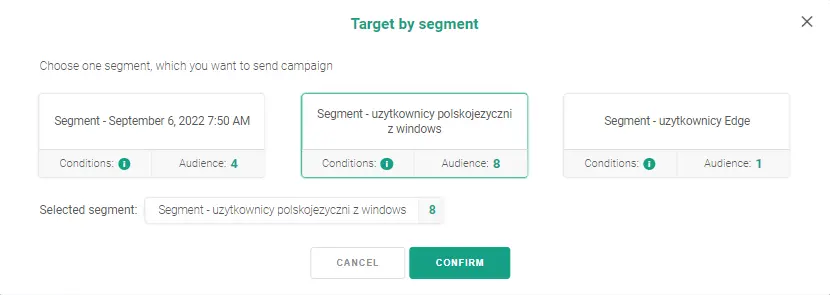
A chosen and clicked segment will be highlighted in green, with information displayed in the ‘Selected segment’ section. You can still switch between segments, and the choices will be updated. You can delete a chosen segment by clicking on in on the segments list or in the “Selected segment” section.
To finalize your choice, click on the ‘Confirm’ button. The modal will close and the chosen segment will appear in the “Audience” section. You can still change your mind and update the settings.

You can also send the campaign to specific labels. The option will consist of labels, replacing previous tags and custom fields. It’s worth noting, however, that sending campaigns with labels is slower than with segments. After choosing the ‘Select labels’ option, a modal will appear. You can filter, include and exclude labels there.
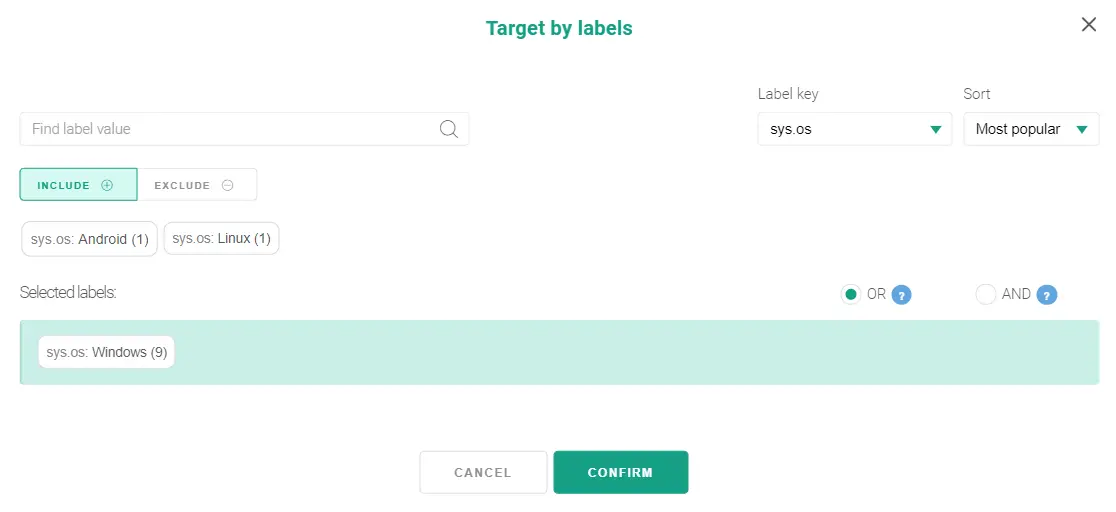
After confirming your choices, the selected labels will appear in the “Audience” section. If you want to remove them, you can click on them in this section.
Targeting by geolocation won’t change. After confirming the choice of the polygon, the selection will appear in the ‘Audience’ sector. Just like with previously described options, you’ll still have a possibility to delete them in this view.
In the ‘Time’ section you can still choose between the ‘Send now’ and ‘Schedule send date’ options.

In the final section, you’ll find suggestions and messages concerning the correct setup of your campaign.

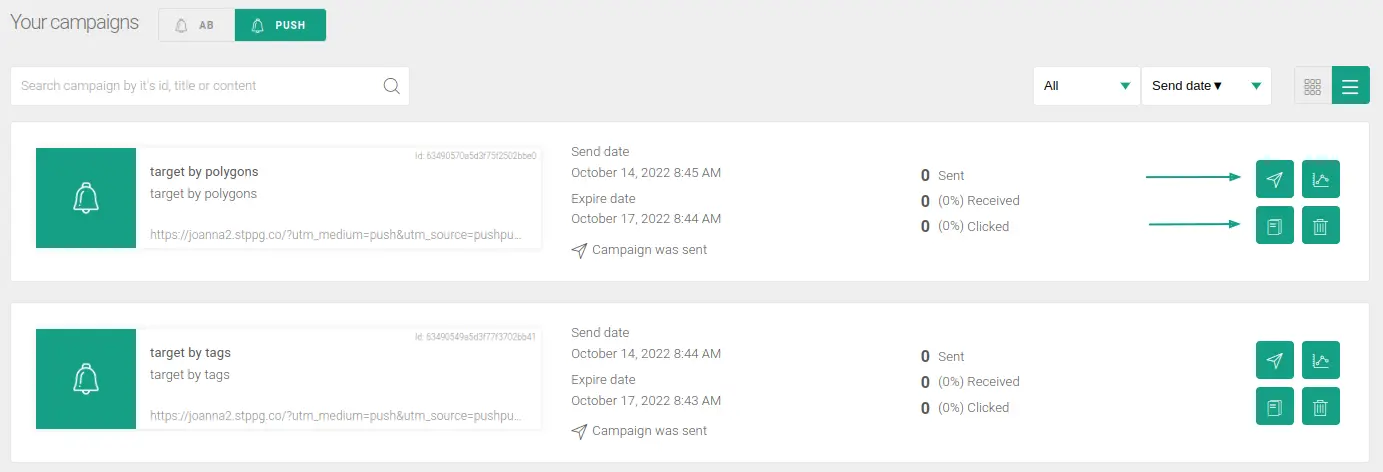
The ‘Campaign list’ view underwent some minor changes. Previously, campaigns with ‘Sent’ status had copy and edit options. Those are now replaced with a ‘Copy and send again’ button. It triggers the action of copying and sending the chosen campaign. If you don’t want to send it right away, you can save the copy as a draft.
Before:
After:

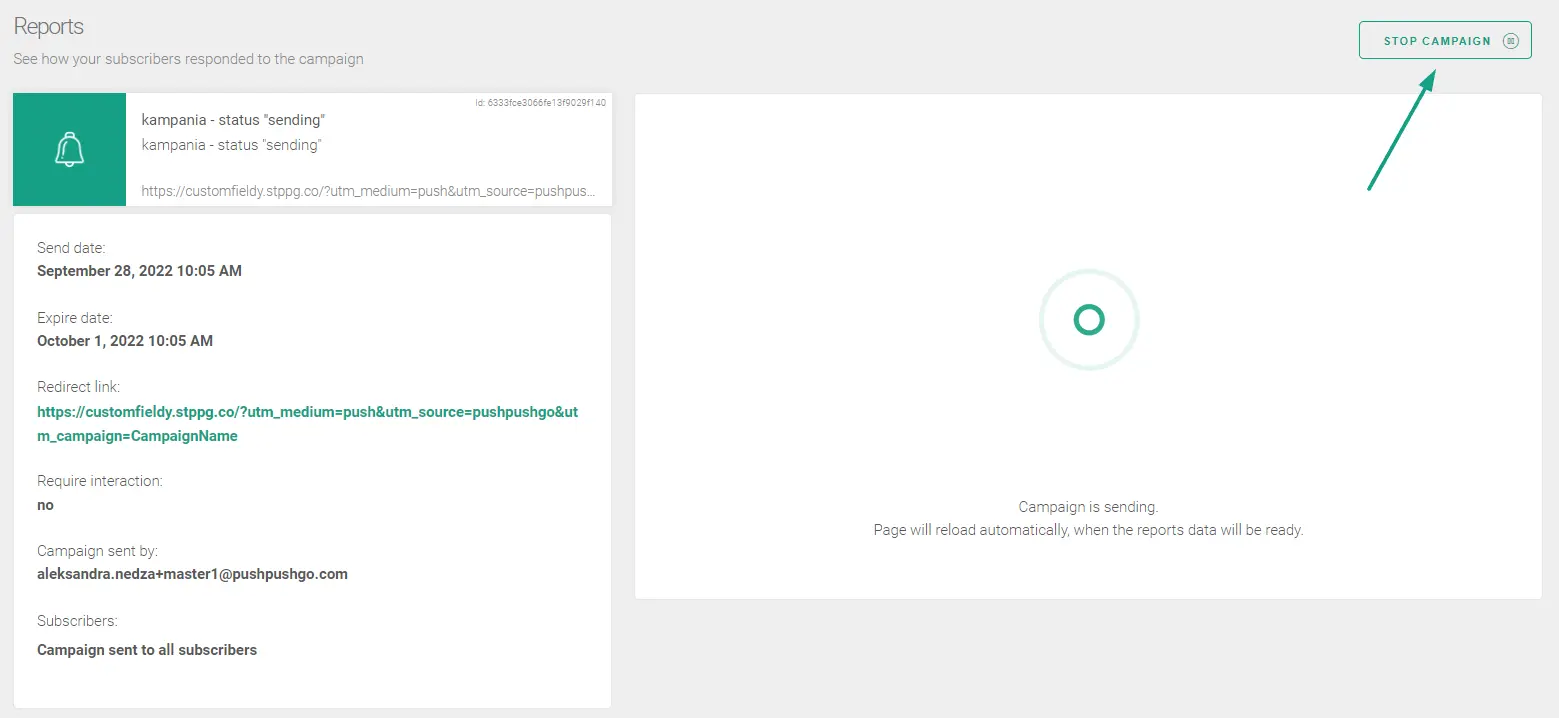
There’s one important change concerning planned campaigns. It’s a new ‘Stop campaign’ option, which cancels the chosen campaigns and prevents it from being used again.

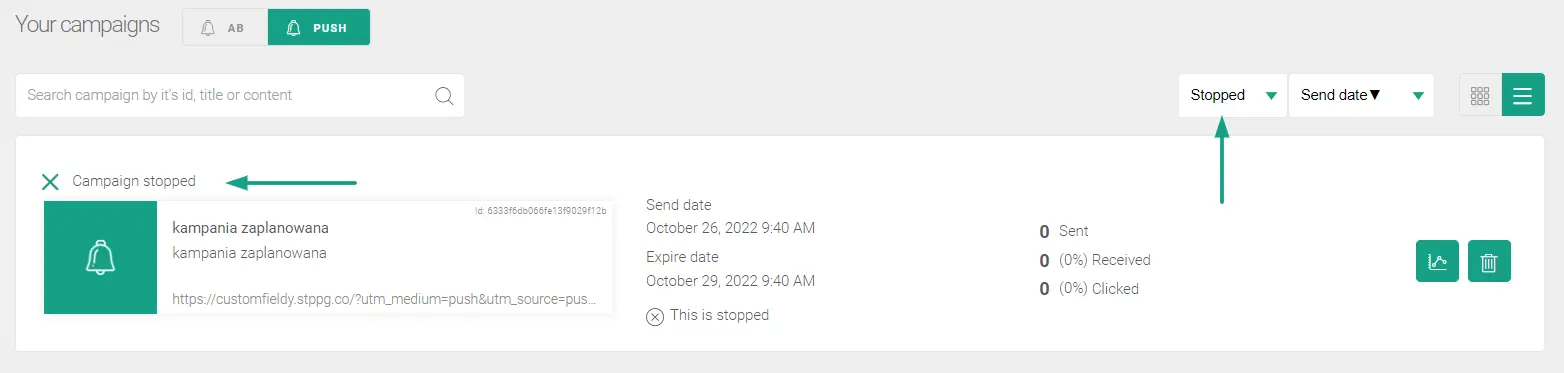
After you prepare your campaign and click ‘Send campaign’, you’ll be able to cancel it as long as it has the ‘Sending’ status. You can do it in the campaign report. The ‘Stop campaign’ button is located in the top-right corner. But bear in mind that our servers are working fast so the time window for cancelling is really short.
Removing tags and custom fields from the subscriber view doesn’t bring any further changes in automation options. We’ve kept the Action - Tags or Action - Custom fields steps. They’ll stack up on a subscriber as labels. While you can add a strategy to labels from “tags” step, the “custom fields” labels will always be set to rewrite the strategy. This way the latter will always display the most accurate value.
Sometime in the future we plan to combine those steps into one called ‘labels’.
If you have any questions regarding new segments and migrating your projects to the new view, contact us at: support@pushpushgo.com

Editor and writer. She is interested in media and new technologies.
-3pf2xltbnb.webp)
-kzjq5bkqnz.webp)
-7qtlabfqyy.webp)