


Automation scenarios in the PushPushGo app allow you to send more personalized push notifications to your subscriber base. The more you know about your recipients, the better you can tailor your push marketing campaigns to their liking. This is where selectors come into action.
In this article, we'll show you all there is to know about selectors and automation scenarios in the PushPushGo app.
There's no doubt that mass push campaigns play a vital role in promoting offers and promotions (in e-commerce) news of the day and most valuable content (publishing). But once you incentivize your subscriber base to your site or your app, then comes a time for a more personal approach. This can be achieved by utilizing automation scenarios.
Automation scenarios allow you to communicate with an individual client, replying directly to their actions on your website or in the app. Those messages include:
Automation scenarios help improve traffic on the website and drive more sales for e-commerce entities. That’s why it’s crucial to bring a personalized touch to your communication, especially when you want to build more personal relations with returning clients.
To use selectors in the PushPushGo application, head on to the “Selectors” tab. Then, apply the parameters for your selectors. Those can measure the following parameters:
How exactly are the selectors prepared? it just takes a few easy steps. First, define it in the Selectors tab in the PushPushGo app. For each selector, you have to prescribe:
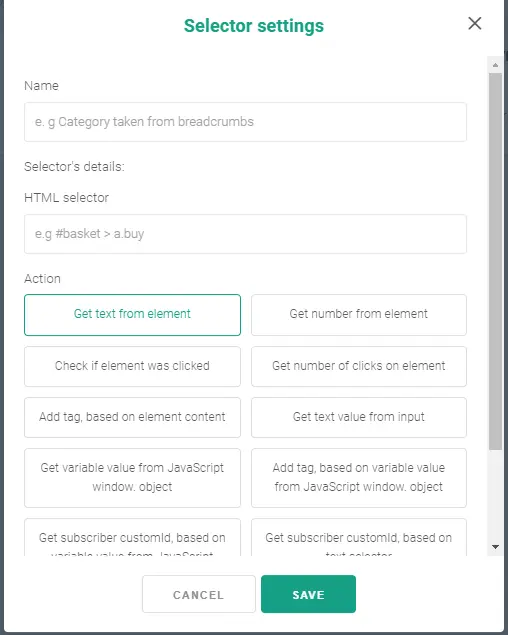
When it comes to defining the selector's action, you have nine options to choose from:
Get text from element - this allows you to collect the name of a given element on the page - like the title of an article - which can then be used as a so-called variable when creating the notification.
Get the number from the item - you can collect numerical information, like how many products are in a subscriber's cart, or the final value of an order. This data can be used in an abandoned cart scenario.
Check if the item has been clicked - collect the information on whether the visitor clicked on the element on the page, like the CTA buttons.
Get the number of clicks from a given element - this action allows you to collect the number of clicks, e.g. in the add comment button. Thanks to this, we know how often the subscriber shares his opinion on our website
Add a tag based on the content of the item - you can collect information about the categories visited on the page in the form of a tag.
Get the value from the input - download the content the recipient enters into input fields. For example, if your site has a product search engine, we can check exactly what phrases visitors have entered.
Download a variable from the browser window - send the stored data to your application in Google Tag Manager using Data Layer.
Add a tag based on a variable from the window object - assign tags to your recipients, using the data collected on the Data Layer in Google Tag Manager.
Non-standard - use recipient information that is stored in class attributes or identifiers. For example, using this action, you can collect the last visited link by a subscriber.
If you want to learn more about the process, go to our user guide.
Then, all you have to do is set up your push automation scenarios and start sending personalized push notifications!

Editor and writer. She is interested in media and new technologies.
-3pf2xltbnb.webp)
-kzjq5bkqnz.webp)
-7qtlabfqyy.webp)